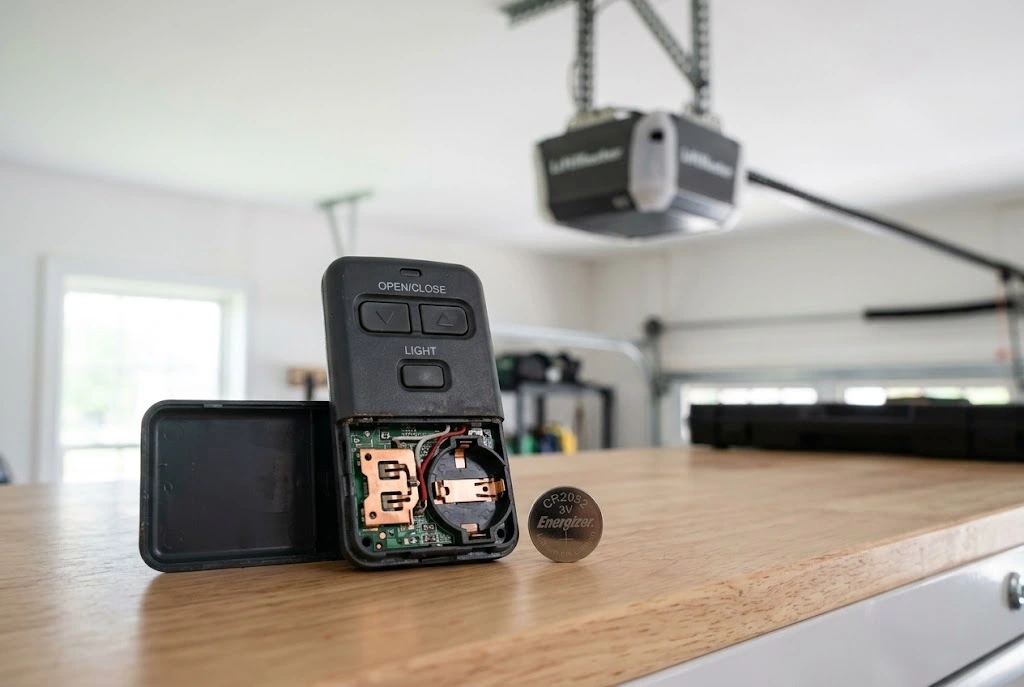
A LiftMaster garage door remote battery provides the power needed for your handheld transmitter to communicate with the garage door opener. When the battery becomes weak or completely depleted, the remote may stop working, operate only from a short distance, or respond inconsistently. Fortunately, changing the battery is usually a simple maintenance task that does not require replacing the entire remote.
The main challenge is choosing the correct battery for the exact LiftMaster remote model. Different LiftMaster transmitters can use different battery types, so it is important to check the existing battery, remote model, or manufacturer documentation before buying a replacement. This guide explains how to identify the correct battery, how to change it safely, and what to check when a fresh battery does not restore normal operation.
What Is a LiftMaster Garage Door Remote Battery?
A LiftMaster garage door remote battery powers the electronic transmitter inside your handheld remote. When you press a button, the battery supplies the energy required for the remote to send its wireless signal to the garage door opener.
The battery is separate from the opener’s electrical power supply. Therefore, a garage door opener can have full power while the handheld remote has a completely dead battery.
This distinction is important during troubleshooting. If the wall-mounted control operates the garage door normally but the handheld remote does not, checking the remote battery is a logical first step.
How to Choose a Battery for LiftMaster Garage Door Remote
When looking for a battery for LiftMaster garage door remote, avoid choosing one based only on size or appearance. The correct battery depends on the exact transmitter model.
Turn the remote over and inspect the casing for a model number or other identification information. You can also open the battery compartment and read the number printed on the existing battery.
Match the replacement battery to the specified type and size. If the remote documentation gives a manufacturer-approved battery specification, follow that information rather than experimenting with another battery.
Check the Existing Battery Number
The easiest method is often to remove the old battery and look for its printed designation. Coin-cell batteries, for example, have identification numbers that distinguish one size and specification from another.
Write the number down before purchasing a replacement. This reduces the risk of ordering a battery that physically fits but does not match the remote’s requirements.
Check the Remote Model
If the battery marking is difficult to read, use the remote’s model number instead. LiftMaster produces multiple transmitter models, and battery requirements can differ between them.
When buying a replacement remote rather than just a battery, compatibility becomes even more important. Our LiftMaster garage door opener remote guide provides additional information about LiftMaster remote options.
How to Change Battery in LiftMaster Garage Door Remote
Many LiftMaster remotes can be opened without complicated tools, although the exact method depends on the transmitter design. Work slowly so you do not damage the casing, clips, or internal components.
1. Examine the Remote
Look around the edges and back of the remote for a battery cover, sliding compartment, screw, or small access slot. The design will determine how the casing should be opened.
2. Open the Battery Compartment
If the remote has a removable cover, open it carefully. Some remotes use a small screw, while others have a cover that slides or snaps into place.
Do not force the casing. Excessive pressure can break plastic clips or damage the remote housing.
3. Check the Battery Orientation
Before removing the old battery, observe how it is installed. Note the positive and negative sides and look at the markings inside the compartment.
This is especially important with coin-cell batteries because installing one backward can make an otherwise functional remote appear completely dead.
4. Remove the Old Battery
Remove the old battery carefully. Avoid bending the metal contacts or damaging the small retaining clips that hold the battery in place.
If you notice corrosion, dirt, or visible damage inside the battery compartment, address that issue before installing the new battery.
5. Install the New Battery
Place the replacement battery in the same orientation as the original. Make sure it sits securely against the contacts without excessive movement.
Do not force a battery into a compartment that does not match its specified size.
6. Close the Remote
Secure the battery cover or tighten the screw if the remote uses one. Make sure the housing is completely closed before testing the controller.
7. Test the LiftMaster Remote
Stand in a safe position away from the garage door’s travel path and press the remote button once. If the opener responds normally, the battery replacement has likely solved the problem.
Test the remote again from a typical operating distance to make sure the signal remains reliable.
Does Changing a LiftMaster Remote Battery Erase Programming?
A battery change is generally different from reprogramming the remote. Replacing a depleted battery does not mean that you should automatically reset the garage door opener or erase its stored remote settings.
That is why it is better to test the remote after installing the new battery before attempting to program it again. If the controller worked previously and the only issue was a weak battery, changing the battery may restore normal operation without any additional setup.
If the remote still does not work after the battery has been replaced correctly, then programming, compatibility, signal, or hardware problems can be investigated.
Signs Your LiftMaster Garage Door Remote Battery Is Weak
A remote battery may gradually lose power rather than failing without warning. Several symptoms can indicate that a replacement is due.
Reduced Operating Range
If you previously opened the garage door from the driveway but now have to move much closer to the opener, the battery may be weakening.
Short operating range can also have other causes, so consider the battery alongside interference, remote damage, and receiver-related issues.
Intermittent Response
If the remote works on some button presses but not others, a weak battery can be one possible explanation. Try replacing the battery before changing more complicated settings.
Weak Indicator Light
Some LiftMaster remotes include an indicator light that activates when a button is pressed. A dim or missing indicator can suggest that the battery has become depleted.
Complete Loss of Remote Operation
If the remote suddenly stops controlling the garage door while the opener itself continues to operate through another control, the battery is one of the first items to check.
For broader troubleshooting, see our guide to garage door remote not working.
LiftMaster Garage Door Remote Battery Problems After Replacement
Installing a new battery does not always solve the problem. If the remote remains unresponsive, check the following areas before assuming the opener is defective.
Incorrect Battery
Confirm the replacement battery matches the exact specification required by the remote. A visually similar battery can still be unsuitable.
Incorrect Battery Orientation
Remove and reinstall the battery according to the positive and negative markings. A reversed battery can prevent the transmitter from receiving power.
Dirty or Corroded Contacts
Inspect the metal contacts inside the remote. Dirt, oxidation, or corrosion can interfere with the electrical connection between the battery and the remote’s circuitry.
Damaged Remote Housing
A cracked or damaged casing can allow the battery to move or prevent consistent contact. Check that the cover closes firmly and that the battery remains securely positioned.
Internal Remote Failure
If a correct fresh battery produces no response and the remote is physically damaged, the transmitter itself may require replacement.
How to Change Battery in LiftMaster Garage Door Remote Safely
Small batteries require careful handling. Keep replacement and used batteries away from children and pets, especially button and coin cells.
Do not puncture, crush, burn, or intentionally short-circuit a battery. Keep the battery compartment away from moisture while the remote is open, and reinstall the casing securely before using the controller again.
Dispose of the old battery through an appropriate battery-recycling or disposal method available in your area rather than leaving it loose in household spaces.
Should You Reprogram a LiftMaster Remote After a Battery Change?
Try the remote first. Reprogramming should not be the automatic response to every battery replacement.
If the remote still fails after installing the correct battery, confirm that the battery is making proper contact and that the opener itself operates normally. Then check whether the remote remains programmed and compatible with the opener.
If programming is required, our guide to how to program a garage door remote provides general guidance. For brand-specific remote issues, additional information is available through the LiftMaster remote pages on this site.
LiftMaster Remote Battery vs. Replacing the Entire Remote
Battery replacement is usually the first option when the remote is physically intact. There is little reason to replace a functioning transmitter simply because its battery has died.
However, a new remote may make sense when the existing controller has damaged buttons, a broken housing, corrosion, water damage, or persistent electronic problems.
Before purchasing a complete replacement, record the old remote’s model number and the garage door opener model. This helps you choose a compatible transmitter rather than one that merely looks similar.
When a Fresh LiftMaster Garage Door Remote Battery Does Not Work
Start by checking whether the garage door opener works from the wall control. If the opener responds normally but the handheld remote does not, focus your troubleshooting on the remote and its compatibility.
Next, test the remote with a fresh battery and inspect the contacts. If another compatible remote operates the opener, the original transmitter may be faulty.
If the opener itself is not operating correctly, replacing the remote battery may not address the real issue. Our garage door opener not working guide can help you investigate broader opener problems.
How Long Does a LiftMaster Remote Battery Last?
Battery life varies according to the remote model, battery type, usage frequency, storage conditions, and other environmental factors. A remote that is pressed many times each day may consume its battery more quickly than a spare controller that is rarely used.
Heat and prolonged storage can also influence battery performance. For that reason, keeping a spare battery available can be useful, particularly when the garage door is an important access point to your home.
Rather than waiting until the remote stops working completely, consider replacing the battery when you begin noticing reduced range, intermittent operation, or other signs of weakening power.
Choosing a Replacement LiftMaster Remote
When a battery replacement no longer solves the issue, choosing the correct replacement remote requires more than matching the brand name.
Check the opener model, existing remote model, receiver technology where applicable, and compatibility information. A compatible remote is much more likely to program correctly and provide reliable operation.
Our garage door opener remote compatibility guide can help you understand the information that should be checked before purchasing a replacement transmitter.
You can also compare remote options with our garage door remotes resource before making a replacement decision.
Frequently Checked Points Before Replacing the Battery
Before ordering a battery, confirm the exact remote model and battery number. After purchasing the replacement, compare the markings on both batteries before installation.
Once installed, make sure the polarity is correct and the cover is securely closed. Then test the remote from a safe location. If it does not respond, move through battery-contact, compatibility, programming, and opener checks in that order.
Final Thoughts on LiftMaster Garage Door Remote Battery Replacement
A LiftMaster garage door remote battery is one of the easiest components to replace when a handheld controller becomes unreliable. The most important step is not the physical replacement itself but identifying the correct battery for the specific LiftMaster remote.
Check the remote model or existing battery, install the replacement with the correct polarity, secure the battery compartment, and test the controller. If the remote still does not work, investigate compatibility, contacts, programming, physical damage, and the garage door opener itself before buying another part.
With the correct battery and a careful installation, many common remote problems can be resolved quickly without replacing the entire controller.
