Moving into a new villa in Dubai, upgrading your home security in Abu Dhabi, or simply replacing a misplaced accessory requires a fundamental understanding of your automated access systems. One of the most frequent tasks a homeowner faces is configuring their remote entry system. Knowing how to program a garage door opener is an essential skill that saves time, eliminates the need for emergency service calls, and ensures your property remains secure. This comprehensive opener programming guide walks you through the entire process, covering standard remote systems, wireless keypads, and modern regional variations.
Whether you are dealing with a freshly installed unit or resetting an existing system for security purposes, executing a correct garage door opener setup is straightforward when you break it down into logical steps. Below is everything you need to know to sync your transmitter with your overhead system seamlessly.
Preparing for Your Garage Door Opener Setup
Before beginning the programming sequence, adequate preparation is key to ensuring safety and accuracy. Garage doors are heavy, highly tensioned mechanical structures. Working around them requires caution, clear spaces, and the right tools.
First, ensure that the path of the garage door is completely clear of vehicles, tools, pets, and bystanders. During the programming cycle, the door may unexpected activate, cycle up, or run down. Second, secure a sturdy ladder that allows you to comfortably reach the main chassis hanging from your ceiling. This chassis houses the primary garage door motor and the electronic logic board responsible for receiving radio frequencies.
Finally, inspect your handheld transmitter. A weak battery is the leading cause of programming failures. If the indicator light on your remote is dim or flickering, replace the battery before attempting to sync it to the overhead unit. Having the manufacturer’s documentation on hand can also be beneficial, though the majority of modern systems rely on a standardized protocol described below.
The Universal ‘Learn’ Button Method
The vast majority of modern automated systems manufactured over the last three decades utilize a simplified synchronization system centered around a dedicated programming button. This is universally referred to as the “Learn” button. Locating and utilizing this button is the core mechanism of learning how to program a garage door opener.
Step 1: Access the Logic Board
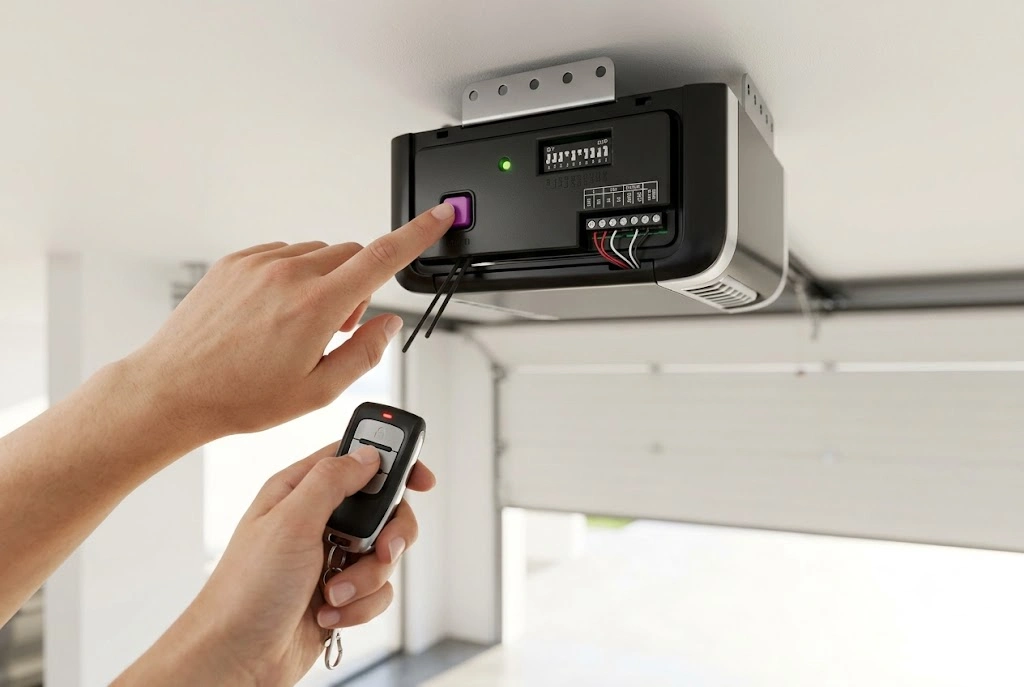
Position your ladder safely beneath the overhead powerhead. You will need to remove or swing open the plastic light cover that protects the internal bulb and wiring components. On the rear or side panel of the motor casing, you will find a small, colored button. This button may be square or round and is typically labeled “Learn” or “Smart.” It is often accompanied by a small LED indicator light.
Step 2: Identify the Button Color
The color of the Learn button (such as yellow, purple, red, orange, or green) is highly significant. Different colors signify different radio frequencies and encryption protocols used by the manufacturer. Ensure that the handheld garage door remote you are attempting to program operates on the exact same frequency as indicated by your specific button color.
Step 3: Initiate the Sync Sequence
Press and immediately release the Learn button on the motor unit. Do not hold it down, as holding the button down for more than a few seconds will wipe the entire memory of the system, erasing all previously programmed remotes. Once pressed, the adjacent LED indicator light will glow steadily or blink slowly, indicating that the receiver is now in pairing mode for roughly 30 seconds.
Step 4: Program the Transmitter
Within that 30-second window, press the specific button on your handheld remote control that you wish to use to operate the door. Hold the button down firmly for one to two seconds, then release it. The overhead motor unit will typically click audibly, or the work light will flash twice. This visual or auditory cue confirms that the overhead receiver has successfully registered the unique rolling code of your remote.
Step 5: Test the Operation
Step down safely from the ladder and move a few paces away from the door. Press the newly programmed remote button to verify operation. The door should react immediately, traveling smoothly along its tracks. If the system fails to respond, wait sixty seconds for the programming cycle to fully clear and repeat the steps from the beginning.
Programming Specific Regional and Smart Systems
While the standard Learn button method applies to mainstream brands, properties across the UAE frequently utilize specialized European or Australian hardware designed for robust climate resistance. For instance, configuring an ATA garage door opener involves a slightly modified interface, often requiring you to hold the ‘Door Code’ button on the receiver panel while simultaneously pressing the transmitter button twice.
Furthermore, residential developments are increasingly shifting toward fully integrated home automation. Setting up a modern smart garage door opener generally transitions away from physical buttons toward software applications. During a smart setup, you will connect your smartphone to the opener’s localized Wi-Fi signal, configure the parameters within a dedicated application, and link the system to your wider home automation network. This allows you to monitor entry logs and operate the system remotely without a physical fob.
Troubleshooting Programming Failures
If you have followed the opener programming guide exactly but your hardware still refuses to sync, several hidden variables could be causing the disruption.
Radio frequency interference (RFI) is a common culprit. High-powered LED or compact fluorescent bulbs installed directly inside the motor housing can emit electromagnetic signals that jam the receiver. Try temporarily removing the light bulbs from the chassis and repeating the programming steps. Additionally, localized wireless networks or neighbor systems operating on overlapping frequencies can occasionally cause sync delays.
Another common point of confusion occurs when a user mistakes a programming failure for a safety lockout. If your remote causes the overhead lights to flash but the door refuses to travel downward, the issue is likely not the programming. Instead, it points to a physical safety mechanism. If you find your garage door not closing, verify that the infrared safety sensors at the base of your tracks are perfectly aligned and clear of dust or debris. Systems built in accordance with safety standards maintained by the Door and Access Systems Manufacturers Association will actively block closing operations if these safety eyes are disrupted, regardless of how perfectly your remote is programmed.
Long-Term Management and Security
Successfully completing your garage door opener setup is merely the first phase of managing your property’s perimeter access. For comprehensive home protection, understanding how to secure garage door vulnerabilities is vital. If you ever lose a remote, move into a pre-owned villa, or part ways with a domestic contractor, you should perform a complete memory wipe on your motor by holding down the Learn button for approximately ten seconds until the LED turns off. This revokes access from all existing devices, allowing you to start fresh and reprogram only the remotes currently in your possession.
Finally, remember that programming stability relies on the physical health of the underlying mechanism. Regular garage door maintenance prevents vibrations that can loosen internal logic board connections over time. Keeping your tracks aligned, your springs tensioned, and your garage door opener cleanly lubricated ensures that your automated system responds instantly to every signal for years to come.
Conclusion
Programming your garage door opener is a fast, highly rewarding maintenance task that reinforces home security and convenience. Whether you are dealing with a traditional rolling code remote, a wall keypad, or a smart internet-enabled controller, the core principles remain identical. Keep your batteries fresh, locate your unit’s programming hub, follow the timed sequences precisely, and maintain your hardware regularly to enjoy effortless automation at the push of a button.
